
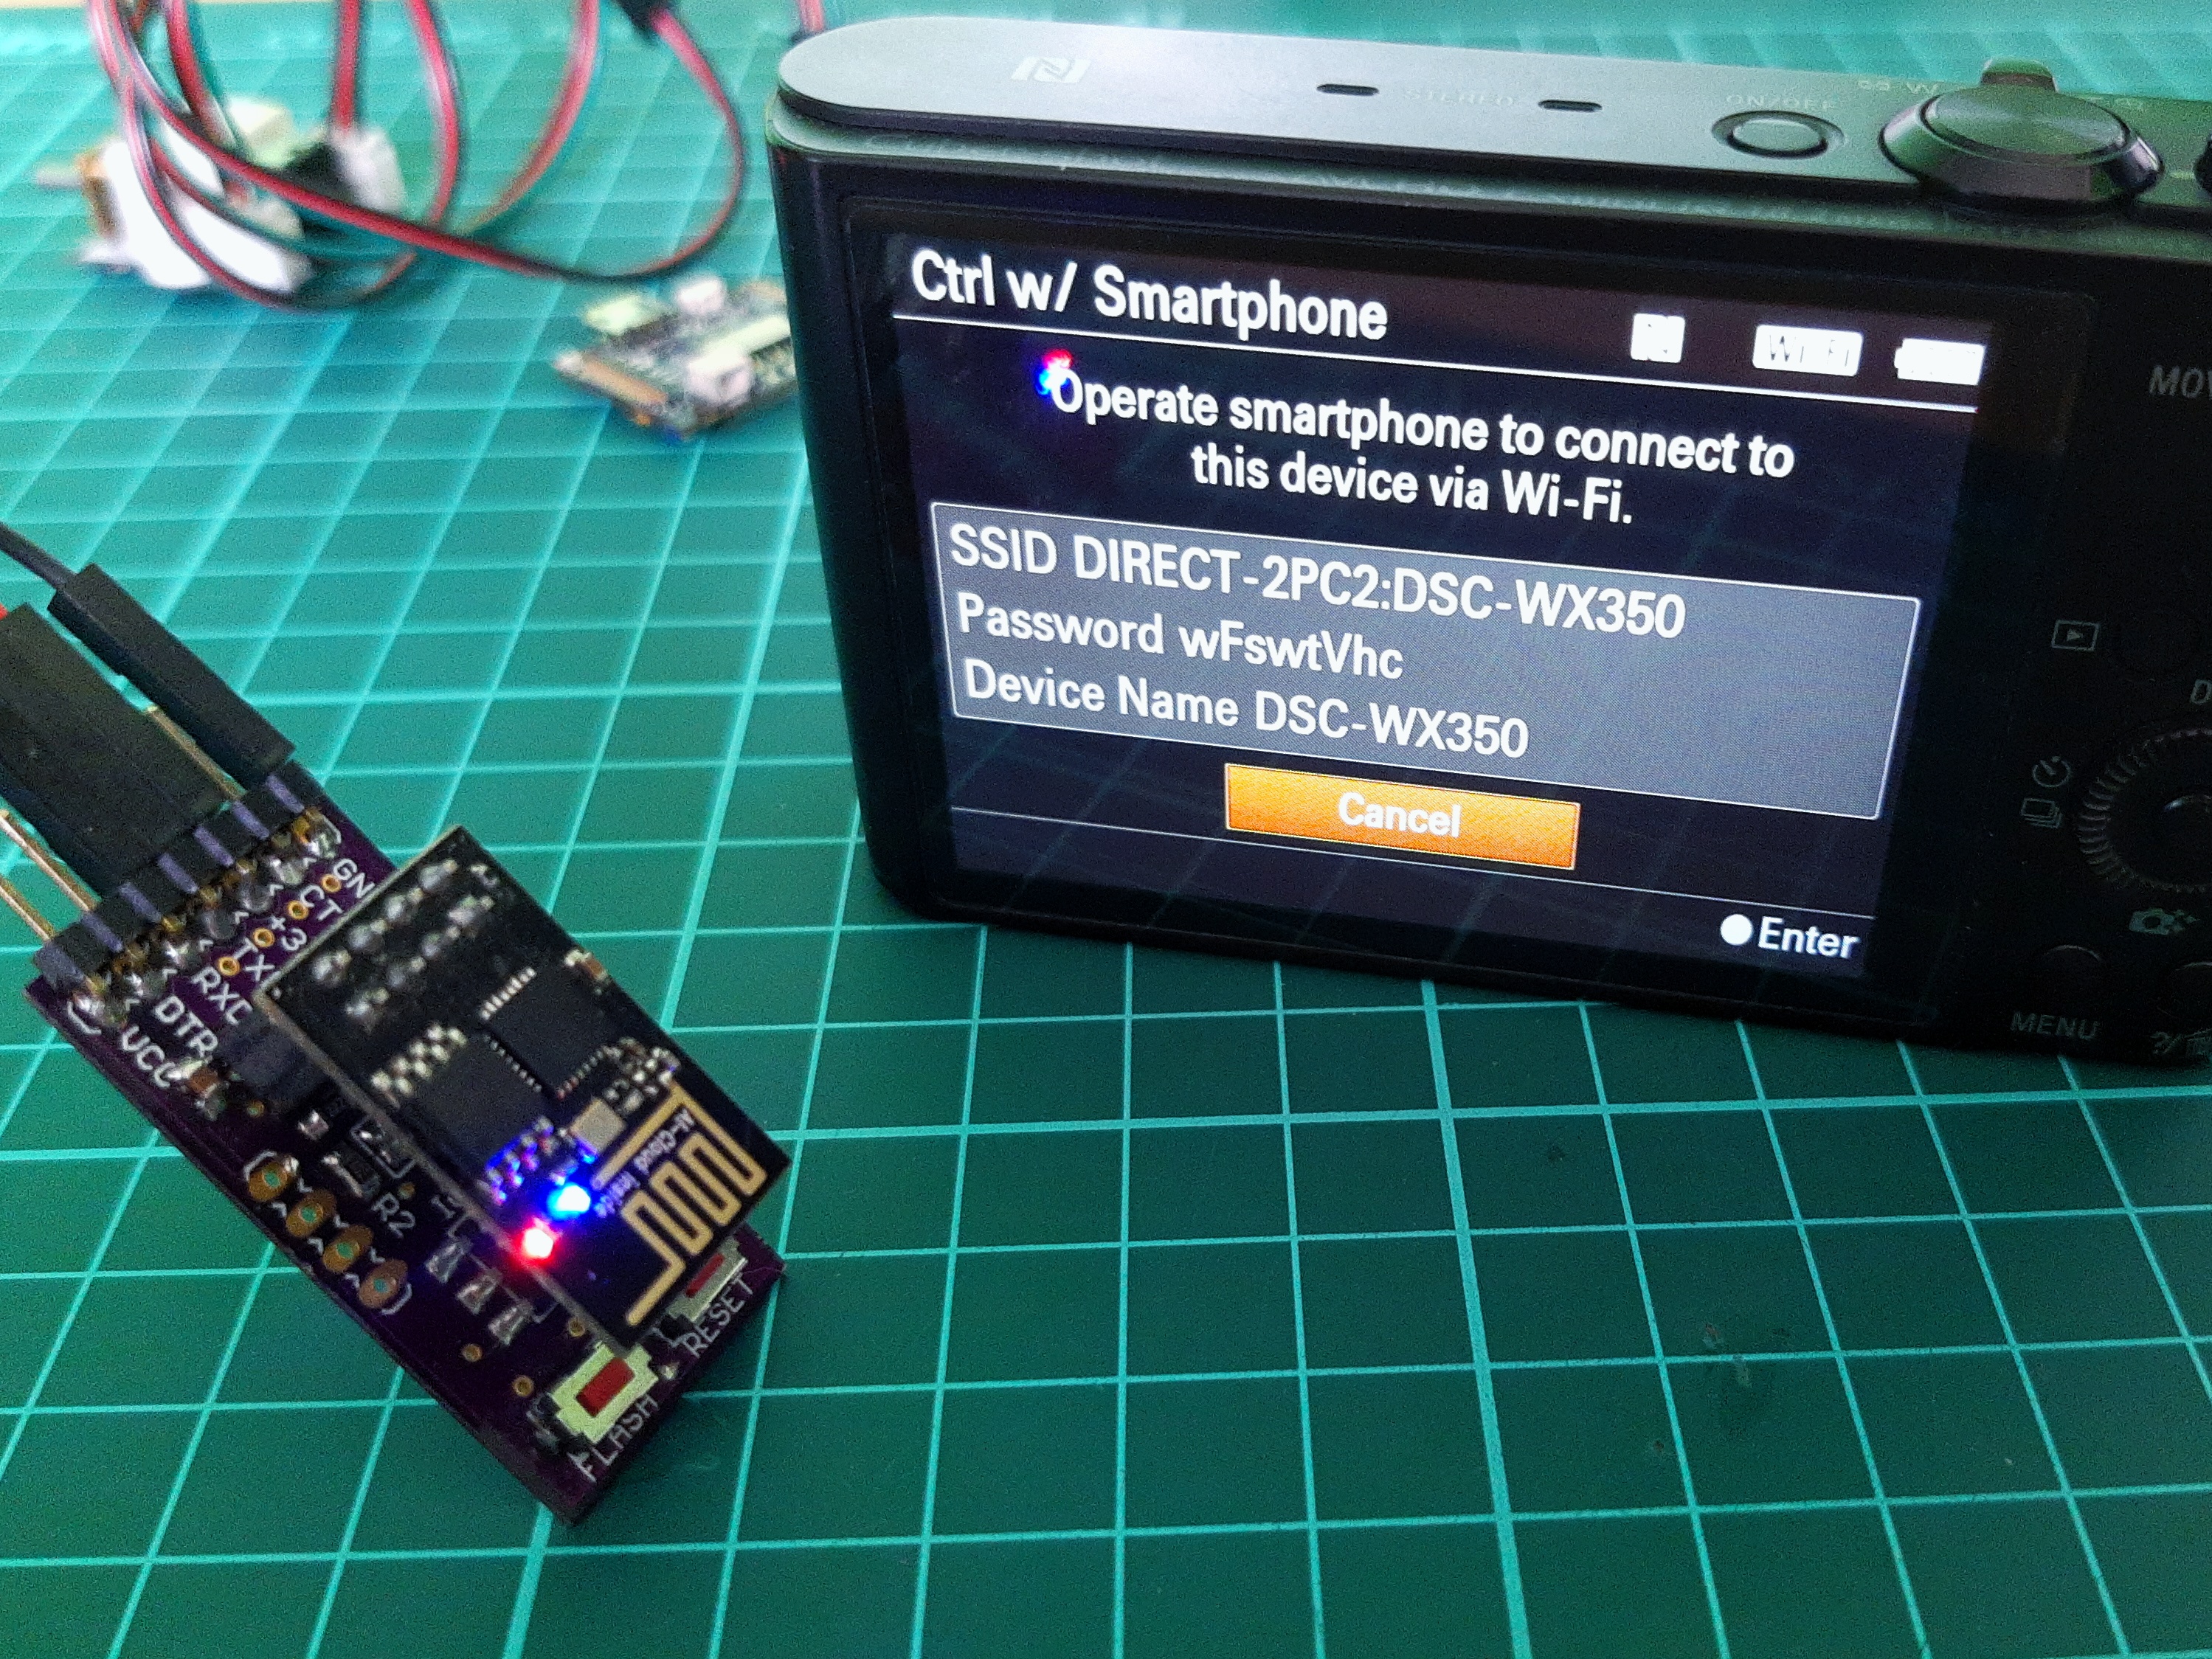
I’ve been using a Sony WX350 compact camera for a few years. It comes in handy when traveling and when the phone’s camera isn’t enough. ne feature I like is its built-in WiFi, which allows me to control the camera remotely using the Imaging Edge Mobile app; This is ideal for group photos or when using a tripod. However, the camera doesn’t have a timelapse function. So, I found the Timelapse – Sony Camera app. This app uses the Sony Remote API to send commands to the camera, but I can’t use the phone while the app is capturing photos. Nonetheless, it’s a good solution. To free up my phone, I plan to implement some parts of the API on an ESP8266 microcontroller, which should be enough to get some good timelapses.
The API documentation says that commands must be sent in JSON format to the camera’s URL using HTTP requests. The API has two main functions: capturing images or video, and transferring images. The capture function belongs to the camera service, and the transfer function to the avContent service. service. These services are mutually exclusive.
The API functions are structured into two main parts: how requests are sent to the camera and how the camera replies. To send a request, a method must be used. The method describes the command or action and has a defined name that can be found in the API documentation. It’s followed by one or more parameters whose values depend on the method. Finally, an ID and a version number are sent. The following example shows the command to change the capture mode from still to movie or video recording.
{
  "method": "setShootMode",
  "params": ["movie"],
  "id": 1,
  "version": "1.0"
}
The reply messages have only two fields: result and ID. The result field is the most important. If the request is successful, the result field will have a value of 0 or the requested data, otherwise the error field will appear along with a code to identify the failure. The following message is the reply to the capture mode change request. It shows that the camera made the change successfully.
{
"result": [0],
"id": 1
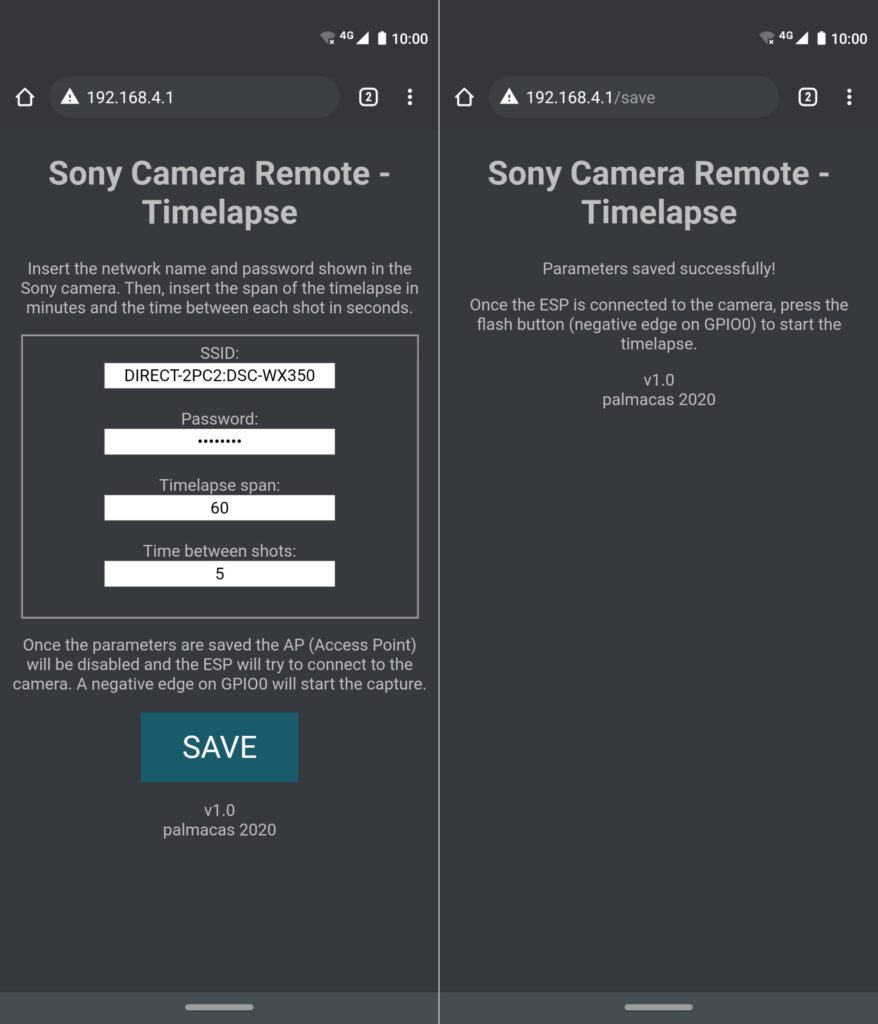
}After understanding how the API works, I wrote a program for the ESP8266 that implements some of its functions. The program starts by creating an Access Point and showing a webpage where the SSID and password of the camera’s Access Point can be set. The webpage also allows for setting the timelapse duration and time between shots. Once the parameters are saved, the ESP8266’s AP is deactivated and the microcontroller tries to connect to the camera’s AP. After a successful connection, the program waits for a button press (low pulse on GPIO0) to start the timelapse.
The code uses the ESP8266WiFi, ESP8266WebServer, and ESP8266HTTPClient libraries to enable the AP, create the webpage server, and manage the HTTP requests.
const char* ssid_ap = "SonyRemoteAP";
const char* password_ap = "sony1234";
ESP8266WebServer server(80); // Create WebServer on port 80
WiFiClient  client; // Create a client to access the camera
String ssid = {};
String password = {};
The ESP8266’s AP name and password, and the web server and web client classes are defined. The values for the ssid and password are written from the webpage.
const int start_button = 0;         // GPIO0 to start capture
const String host = "10.0.0.1";     // Camera IP, defined on API documentation
const String http_port = "10000";   // Camera port, defined on API documentation
const String url = "/sony/camera";  // URL to send htto request, defined on API documentation
int timelapse_span;                 // Timelapse span
int shot_period;                    // Time between shots (in seconds)
int shot_period_ms;                 // Time between shots (in milliseconds)
int picture_number = 0;             // Max number of pictures on the timelapse
int op_mode = 0;                    // Operation mode
The button, host IP address and port, and URL for posting HTTP requests are also defined. These values may vary depending on the camera model and can be checked in the API documentation. The timelapse duration and number of pictures to shoot are defined in the other variables.
char setShootMode[] = "{\"method\":\"setShootMode\",\"params\":[\"still\"],\"id\":1,\"version\":\"1.0\"}"; // Set shot mode to "still"
char actTakePicture[] = "{\"method\":\"actTakePicture\",\"params\":[],\"id\":1,\"version\":\"1.0\"}"; // Take a picture
char setFocusMode[] = "{\"method\":\"setFocusMode\",\"params\":[\"AF-S\"],\"id\":1,\"version\":\"1.0\"}"; // Set focus mode to Single AF
char setAutoPowerOff[] = "{\"method\":\"setAutoPowerOff\",\"params\":[{\"autoPowerOff\":60}],\"id\":1,\"version\":\"1.0\"}"; // Set automatic power off after 60 seconds
The four strings are the API functions used in the project and are written using the JSON format. Arduino has a library to code and decode JSON, but I’m not going to use it because as the parameters doesn’t change its not needed.
const char index_html[] PROGMEM = R"rawliteral(<!DOCTYPE html>...</html>)rawliteral";
const char save_html[] PROGMEM = R"rawliteral(<!DOCTYPE html>...</html>)rawliteral";
The two constant contains the webpages HTML code, as the code is long, I didn’t post it here, but it’s available on GitHub. On the first webpage I can setup the Access Point’s SSID and password, and timelapse duration and the number of pictures to shoot. The second webpage just confirms that the parameters were saved.
void setup() {
  WiFi.mode(WIFI_AP_STA);
  WiFi.softAP(ssid_ap);
  server.on("/", HTTP_GET, handleRoot);
  server.on("/save", HTTP_POST, handleSave);
  server.begin();
  pinMode(start_button, INPUT_PULLUP);
}
On the setup loop the code starts the Access Point and the web server. The default IP address for the webpages is 192.168.4.1.
void loop()
{
  switch (op_mode)
  {
    case 0:
      while (picture_number == 0) {
        server.handleClient();
      }
      op_mode = 1;
      Serial.println();
      break;
    case 1:
      WiFi.begin(ssid, password);
      while (WiFi.status() != WL_CONNECTED) {
        delay(500);
      }
      httpPost(setShootMode);
      op_mode = 2;
      break;
    case 2:
      while (digitalRead(start_button) != 0) {
        delay(100);
      }
      op_mode = 3;
    case 3:
      httpPost(setFocusMode);
      for (int i = 0; i < picture_number; i++) {
        httpPost(actTakePicture);
        delay(shoot_period_ms);
      }
      op_mode = 4;
      httpPost(setAutoPowerOff);
      break;
    case 4:
      delay(100);
      break;
  }
}
In the loop function, a switch case is configured using the variable op_mode, to alternate the operation mode between the web server, the connection to the Access Point of the camera, the wait for the button push and the timelapse capture.
The function server.handleClient() allows the connection from a computer or a phone to the Access Point and shows the webpages. When the parameters are saved it stops.
void httpPost(char* j_request);
void handleRoot();
void handleSave();
The function httpPost(char* j_request) post the HTTP request. The argument of this function is the API function written on JSON format. The function handleRoot() posts the main webpage, and the function handleSave() posts the confirmation webpage.
I used an ESP-01 module and the ESP8266 Breakout Board to ease the ESP8266 flashing. The code with comments is available on GitHub.
GitHub: SonyRemoteTimelapse
For more information:
Sony Camera Remote API
WX350 Compact Camera
Arduino core for ESP8266
A Beginner’s Guide to the ESP8266
Update ESP-01 Firmware
If you have any questions, feel free to ask.